This article originally appeared on the FOCUS blog.
We at Meister are very proud of the fact that MeisterTask is intuitive, easy to use, and takes very little time to get started. However, MeisterTask is also capable of powerful things, such as automations, that can truly make your life easier and change the way you work. But to get the most out of automations — and therefore, MeisterTask itself — you’d have to know exactly what they can do and how you can use them. Keep reading and you’ll learn how to unlock the power of MeisterTask.
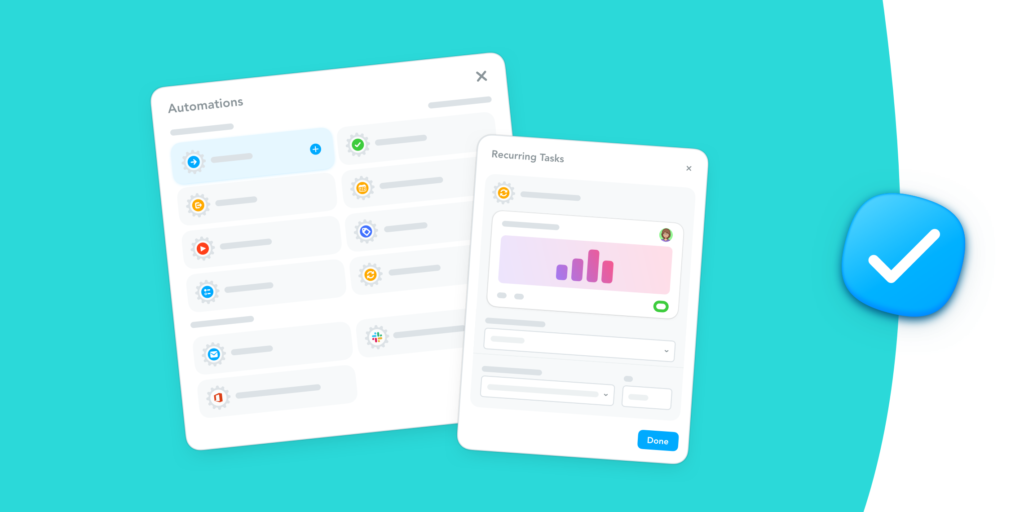
What Exactly Are Automations?
Automations are actions defined by you, that are then performed automatically by MeisterTask. That sounds a bit technical and a bit complicated, so let’s look at an example.
Let’s say that in your workflow, you’ve got a section called Review. Each time a task makes it to Review, it should be assigned to your colleague John because he always looks over your work before it’s sent out. When you move your task over to Review, you have to remember to assign the task to John. With an automation, you don’t have to remember to do that anymore. You can set it up so that any task moved into Review is automatically assigned to John. You define the action, MeisterTask auto-magically takes care of it.
Why Use Them?
At first glance, automations might seem like just another technical thing to figure out. Never fear, they are extremely easy to set up and the benefits far outweigh the very little time it takes to get to know them.
The most obvious advantage of using automations is saving time. It might not seem like a lot of time, but imagine how many actions you can automate, and then multiply that by how many times those actions are performed throughout the day by you and your team. And this time saved isn’t only about increasing efficiency, it’s also about reducing menial work. And, in my experience, less menial work means happier workers.

Along with saving time, you’ll also increase consistency in your work. You won’t have to rely on your busy brain to remember to assign that task or track that time. You simply tell MeisterTask once what you want to happen, and it will always get done, without fail. The increase in consistency also leads to better teamwork and collaboration. It is impossible for anyone to drop the ball on these little things if MeisterTask is the one taking care of them. Tasks will find their way to where they need to go, reaching the right project board and/or assignee even across teams.
Last but not least, and my favorite motivation for using automations, they are just plain convenient. If I don’t have to be responsible for updating a task’s status or tag, then hallelujah, I can go back to worrying about everything else I have to do. Ready to see how they work?
Which Automations Are Available?
In this section, I’ll go through the automations one-by-one, explaining a few situations in which you might want to use them, as well as how to set them up. If you’re looking for information about recurring tasks, I’ve put that at the very bottom because they are super special and I like to save the best for last!
All the automations described below can be found in the automation panel. To get to the automation panel, click the arrow in a section header, then click Automations.

Click Add Automation and you are ready to go.

Let’s see what these things are all about!
Assign task
As described in the example above, you can choose to assign a task to a particular person based on a section in your workflow. This could be useful for passing off tasks to a colleague but it could just as well serve as a personal reminder system. If every time you create a task, you put it in the To Do section, and the To Do section has an automation to assign tasks to you, then all tasks you create will automatically be assigned to you.

To do this, choose the relevant section and assignee from the drop-down menus. If you want this to apply to all the tasks already in the section, tick the box next to Run this action on all existing tasks in this section.
Move task
Automatically moving a task is particularly helpful when tasks need to make their way between project boards. Those project boards might belong to different teams, in which case the task is being handed off, and setting up an automation ensures a correct and timely delivery. In this way, the Done section on your team’s project board shoots off tasks to another team’s To Do section.
But those project boards could also belong to individuals or different offshoots of the same team. For example, my team and I use one project board to keep track of blog post ideas and requests, as well as prioritize which posts should be written first. When an idea is chosen, we pull the task into a section called Selected. We have an automation set up so that any task pulled into Selected gets sent to the marketing project board, and that’s where things really get done.
This, too, is easy to set up. Choose the origin section from the drop-down menu at the top. Choose the destination section in the drop-down menu at the bottom. Just like that, your tasks move right along!
Time tracking
I am more of a ballpark person myself, but if you need to keep strict track of how much time you spend on tasks, you don’t have to remember to start and stop the timer yourself. You can use the sections on your project board as the start and stop for your timer by setting up this automation. For example, say you’ve got a To Do section and as soon as you pull the tasks into In Progress, the time tracker starts. When you pull the task over to Done the time tracker stops. Finding the exact times spent on your tasks couldn’t be easier.
To set this up, choose the appropriate section from the drop-down menu. Then choose whether the time tracker should start or stop in this section. If you’re doing this, you’ll probably want to set up both a start and a stop automation. Otherwise, that timer might keep running.
![]()
Add checklist
This is by far my favorite automation. If you aren’t already using predefined checklists, check them out! Save a checklist that you use often, whether it be for a process, task participants, or anything else. Then add that checklist to tasks automatically with this automation. As soon as a task lands in a certain section on your board, that checklist you saved will load. No more manually writing or adding checklist items!
Setting up this automation is a piece of cake. Choose the appropriate section from the top drop-down menu. Then choose the checklist that should load in the bottom drop-down menu. Find out more about this particular automation by reading this blog post on adding predefined checklists to tasks or this blog post on multiple checklists.

Update status
You can even automate the updating of task status. When you’re done with a task, drop it into your Done section and watch as MeisterTask automatically changes the status to completed. If you really want to get that pesky task out of sight you can even set the status automation to completed and archived.
Once again, choose the appropriate section from the drop-down menu. Then select the status that tasks should be updated to.

Update due date
This is a nifty little automation with several variations, all of which are useful. If you’ve got your workflow set up so that when you pull tasks into your In Progress section, you know that means you’ll do those tasks today, then the first option is for you. Update the due dates of tasks put in the section to today. That will make it clear to the assignee and the rest of the team that it’s time to get down to business.
Maybe you have your workflow down to an exact science and can say how many days it should ideally take to complete a task — kudos to you, by the way. Or maybe tasks have to be completed on a tightly regimented schedule due to orders or dependencies. If this is the case, the second option is for you. You can set the due date of any task put in the section to a given number of days in the future.
The third option might seem strange at first, but it’ll definitely come in handy for tasks that hit bumps, get blocked or are put on hold for one reason or another. You can create a section for such tasks, calling it On Hold, and then automate the removal of due dates for tasks put in that section. That way you won’t have the orange overdue warning staring you in the face when you can’t do anything about it.
To set one of these options up, choose the appropriate section from the drop-down menu. Then choose what should happen to the due date.

Update tags
Tags are one of the most creative features in MeisterTask. You can use them to organize your work and project boards in whatever way makes the most sense to you and your team. Some of my project boards use tags to indicate subject matter, some to indicate other department’s involvement, some to indicate priority. However you use them, you might benefit from adding or removing a tag to tasks when they reach a particular point in your workflow. By doing this you can more easily view the board at a glance and filter tasks more precisely.
To add this automation, choose the appropriate section from the drop-down menu. Then choose if tags should be added or removed, as well as which tag or tags.

Send email
One of the greatest benefits of MeisterTask is its ability to bring all your information together and centralize your work. But occasionally, events in MeisterTask are so important that they need to make their way into an email inbox. For example, if you have a client who likes to be updated on progress but isn’t a part of project, an email automation might be a good solution. You can set up an automation so that an email is sent to your client any time a task makes its way into the Done section.
You might also use this for yourself or your team. For example, if you do decide to make that On Hold section mentioned earlier, maybe you’d like an email each time a task is put there so that you can alleviate any bottlenecks yourself. Or maybe project members would like to know the second tasks are moved into the Done section — it might mean that dependencies have been eliminated.
No matter what you use this for, it’s easy to set up. Choose the section from the drop-down menu and then choose the recipient of the email.

Send Slack message
If you’d rather be a little less formal, you can have MeisterTask send a Slack message instead of an email. Choose the section and the Slack channel et voila, message delivered. If you haven’t integrated your accounts yet, check out this help center article that’ll help you set up your Slack integration.

Take it one step further and when that message arrives, update task details directly in Slack using the menus. This might be the quickest and easiest way to make sure that newly created tasks get the assignees, due dates and tags they need. Isn’t it a relief when tools play so well together?

Notify Office365 Group
If your whole team would like to receive an email when a task is moved into a particular section and you’re using Microsoft Office365, this option is for you. Make sure to set up your user groups correctly in Office365 and you’re good to go. We also have a help center article that explains everything you need to know about using MeisterTask and Microsoft Teams together.
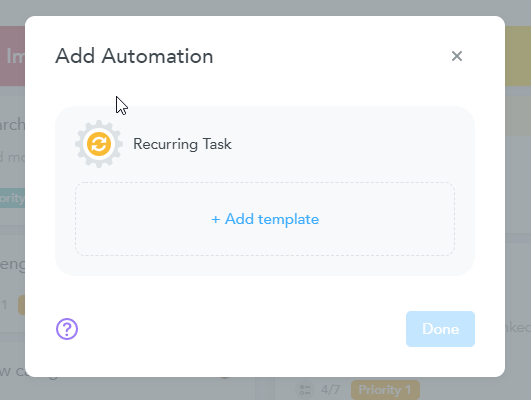
Recurring task
As I mentioned at the beginning of this automation journey, recurring tasks are special. They aren’t an update to an existing task but rather the creation of brand new ones on a schedule defined by none other than yourself.
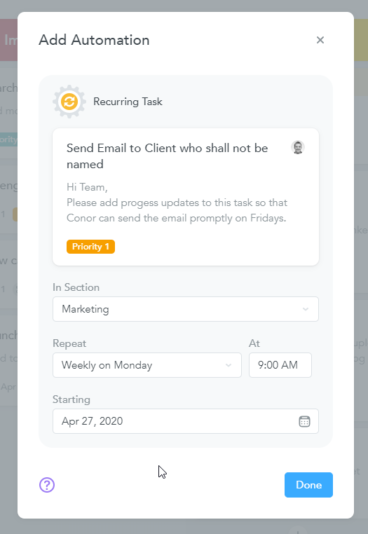
If you have a task that you need to do once a week, once a month, once an anything, and you don’t want to have to remember to create it and do it, recurring tasks are the answer. Conor should send an email to that hard-to-please client every Friday with a summary of the progress? Don’t remind Conor. Make him a recurring task and have everyone add the progress updates to the task as they happen.
Since recurring tasks actually create new tasks, you have to make a task template. It’s easier than you think. Go through the automation panel, the same way we did for all the other automations, and then click Add template.
Once you’ve done that, set up the task as you’d like it to appear each time. Give the task a title, a description, a checklist, attachments and watchers, as you normally would. Then click Due Date and you’ll see the option to either have the task due the day it’s created or in a given amount of days in the future. For this example, I want a task created every Monday that’s due every Friday, so I’ve set the due date to 4 days in the future.

In the next dialog, choose in which section the recurring task should appear, how often it should repeat and when the first one of these recurring tasks should be created.
Just like that, you’ve got a task that will come back to haunt you again and again, exactly as you wanted. Recurring tasks really are special and we hope you’ll start using them if you don’t already.

Automate Away
Now you know what automations can do for you and how easy they are to set up, we hope you’ll take advantage of them. Save some time, increase your consistency and efficiency, and most importantly, take a load off! We’d like to hear how you get on so drop us a line here on the blog or on Twitter @MeisterTask.
This article originally appeared on the FOCUS blog.